Chapter 11. Tricks and Hacks
In the current chapter, we are going to see some tricks, hacks, and techniques, which will make our work with Python easier in the PyCharm IDE. In particular, we will see:
- How to properly format our code.
- Conventions for naming elements in the code.
- Some keyboard shortcuts.
- Some code snippets.
- Techniques to debug our code.
Code Formatting
The right formatting of our code will make it easier to read and understand in case someone else needs to work with it. This is important because in practice we will need to work in a team with other people and it is highly important to write our code in a way that our colleagues can quickly understand it.
There are some defined rules for correct formatting of code, which are collected in one place and are called conventions. The conventions are a group of rules, generally accepted by the programmers using a given language, which are massively used. These conventions help to build norms in given languages - what the best way to write is and what good practices are. It is accepted that if a programmer follows them then their code will be easy to read and understand.
The Python language is created by the organization Python Software Foundation (PSF). Good writing practices can be different in each project, but most of them are done by the authors of the language (mostly Guido van Rossum). You should know that, even if you do not follow the imposed conventions recommended by PSF, the code will work (as long as it is written correctly), but simply will not be easy to understand. Of course, this is not fatal on a base level, but the faster you get used to writing quality code, the better.
The official Python code convention by PSF is located on the page PEP 8 – Style Guide for Python Code: https://www.python.org/dev/peps/pep-0008/. It is important to note that the examples which we gave until now and the ones that we will give in this book are guided by it.
For formatting the code, PSF recommends each inside level to be 4 spaces inside (or one tab), as it is in the example below. The language does not accept mixing tabs with spaces:
if some_condition:
    print("Inside the if statement")
It is possible to instead of using 4, use 2 spaces, but it is not recommended.
Here is how two nested constructions look. Each block starts at 4 intervals inside. The number of spaces at the beginning of each row indicates what the indentation level is:
if some_condition:
    print("Start of outer if statement")
    if another_condition:
        print("Inside the inner if statement")
    print("End of outer if statement")
The formatting of the code in Python is extremely important for it to work. Code that is not formatted throws an error.
This is an example of badly formatted code according to the accepted conventions for writing code in Python:
if some_condition:
print("Inside the if statement")
Once you run the code the following error is thrown and the program stops working:
IndentationError: expected an indented block
The command inside if construction should be 4 spaces inside (or one tab). Right after the keyword if and before the condition of the check you should write a space.
The same rule is applied for the for loops and the other nested constructions. This is another example:
Correct:
for i in range(5):
    print(i)
Wrong:
for  i  in    range(5):
print( i )
For our convenience, there are keyboard shortcuts in PyCharm which will be explained later in this chapter, but for now, we can check one combination. It is used for formatting the code in the whole document: [CTRL + ALT + L].
Let's use the wrongly formatted example from earlier:
for  i  in    range(5):
print( i )
If we press [Shift + Alt + F], which is our combination to format the entire document, we will get code formatted according to generally accepted Python conventions and it will look the following way:
for i in range(5):
    print(i)
This key combination can help us if we work with badly formatted code. However, automatic formatting does not affect the naming of our variables (as well as other elements in the code), which we have to take care of ourselves.
Naming Code Elements
In this section, we will focus on the accepted conventions for naming projects, files, and variables, defined by PSF.
Naming Projects and Files
It is recommended to use a descriptive name for naming projects and files, which suggests the role of the respective file / project, and at the same time, the lowercase_with_underscores convention is also recommended. This is a convention for naming elements, in which each word, including the first one, starts with a lowercase character, and each word after is connected with an underscore (_), for example, expression_calculator. It's acceptable to name projects using the PascalCase convention - each word, including the first one, starts with a capital letter, and the next are appended to each other - ExpressionCalculator.
Example: The book starts with the First steps in coding chapter, therefore an exemplary name for the solution for this lecture can be first_steps_in_coding or FirstStepsInCoding. The files in a project should follow the lowercase_with_underscores convention. If we take for example the first problem in the First steps in coding lecture, it is called Hello World, therefore our file in the project will be called hello_world.py.
Naming Variables
In programming, variables keep data, and for the code to be more understandable, the name of a variable should suggest its purpose. Here are some recommendations for naming variables:
- The name should be short and descriptive and explain what the variable serves for.
- The name should only contain the letters a-z, A-Z, the numbers 0-9, and the symbol '_'.
- It is accepted in Python for the variables to follow the
lowercase_with_underscoresconvention. - You should be careful with uppercase and lowercase letters because Python distinguishes them. For example,
ageandAgeare different variables. - The names of the variables cannot coincide with keywords in the Python language, for example
foris an invalid name for a variable.
| Although using capital letters in the names of variables is allowed, in Python it is not recommended and is considered a bad style of naming. |
Here are some examples for well-named variables:
first_nameagestart_indexlast_negative_number_index
Here are some examples for badly named variables, even though the names are correct according to the Python compiler:
firstName(named after another convention, which is not accepted in Python).AGE(written in capital letters).Start_Index(contains capital letters).lastNegativeNumber_Index(missing '_' before each word).
At a first look all these rules can seem meaningless and unnecessary, but with time passed and experience gained you will see the need for conventions for writing quality code to be able to work easier and faster in a team. You will understand working with code, which is written without complying with any rules for code quality, is annoying.
Shortcuts in PyCharm
In the previous section, we mentioned some of the combinations, that are used for formatting code: [Ctrl + Alt + L] is used for formatting the whole code in a file. These combinations are called shortcuts and now we will give more thorough information about them.
Shortcuts are combinations, that give us the ability to perform some actions easier and faster, and each software development environment has its shortcuts, although most are repetitive. We will now look at some of the shortcuts in PyCharm.
| Combination | Action |
|---|---|
| [CTRL + F] | The combination opens the search window, by which we can search in our code. |
| [CTRL + /] | Comments part of our code and accordingly removes the comment which is already commented. |
| [CTRL + Z] | Brings back one change (so-called Undo). |
| [CTRL + SHIFT + Z] | The combination is opposite of [CTRL + Z] (the so-called Redo). |
| [CTRL + ALT + L] | Formats the code according the default conventions. |
| [CTRL + Backspace] | Deletes the word to the left of the cursor. |
| [CTRL + Del] | Deletes the word to the right of the cursor. |
| [CTRL + S] | Saves all files in the project. |
More about the shortcuts in PyCharm can be found on the website of JetBrains: https://www.jetbrains.com/help/pycharm/mastering-keyboard-shortcuts.html.
Code Snippets
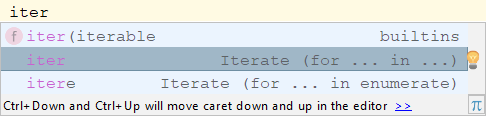
In PyCharm there are the so-called code snippets (code snippets), which write a block of code by using a code template. For example, by writing the shortcode "iter" and then pressing [Tab] code for ... in ...: is generated in the body of our program, in the place of the shortcode. This is called “unfolding a code snippet”. On the figure below you can see the "iter" snippet in action:
Creating Your Code Snippet
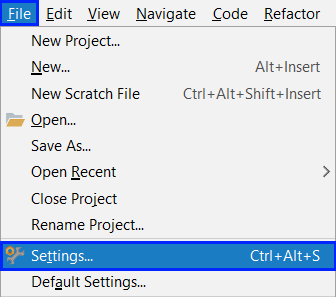
In this section, we are going to show you how to make your code snippet. We will see how to make a live template for two nested loops. To begin we must create a new empty project and go to [File] -> [Settings], as shown in the picture:
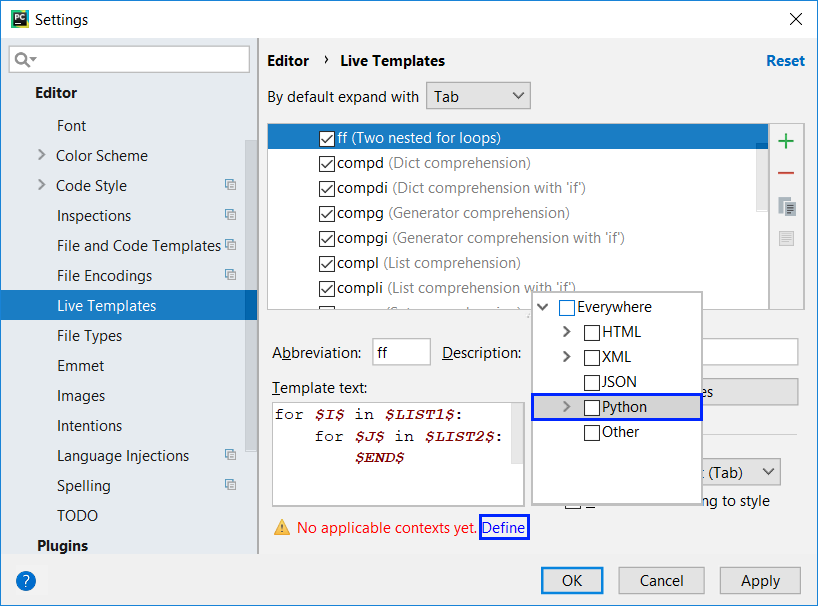
In the window that we opened, we must choose [Editor] -> [Live Templates], and from the section, we should choose the arrow before the checkbox for Python. This is where all the existing snippets for Python are located:

We choose a snippet, for example, iter, we explore it:
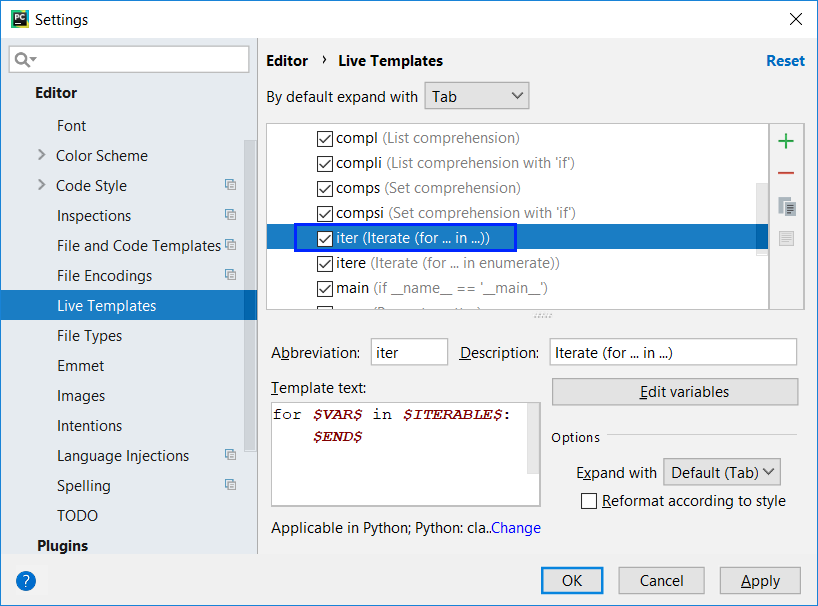
We see many things we haven't seen before yet, but don't worry, we will become acquainted with them later. For now, we want to create our snippet. To do so we choose the button Add (the green + on the right). From the list, we choose [1. Live Template]. In the bottom part of the window, on the place of Abbreviation, we should write a short name, which will be used to call the snippet (for example ff, for for, for), for Description we give a useful description, and for Template Text, we input the following:
for $I$ in $LIST1$:
    for $J$ in $LIST2$:
        $END$
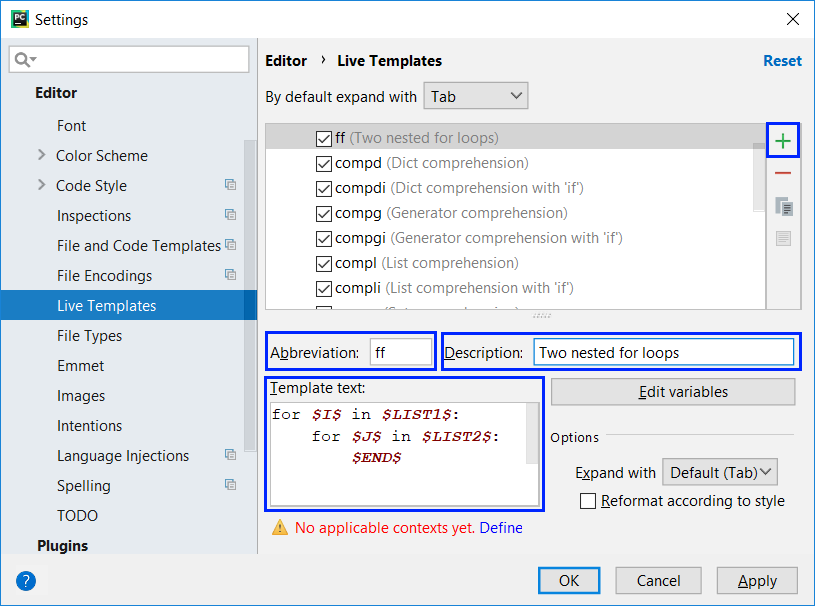
We receive a warning to choose context or the cases our snippet will show (the red text under Template text). We choose Define and from the appeared menu we check Python.
Now, if we write ff in PyCharm, our new live template appears:

Code Debugging Techniques
Debugging plays an important role in the process of creating software, which is to allows us to follow the implementation of our program step by step. With this technique, we can follow the values of the local variables because they are changing during the execution of the program and remove possible errors (bugs). The process of debugging includes:
- Finding the problems (bugs).
- Locating the code, which causes the problems.
- Correcting the code, which causes the problems so that the program works correctly.
- Testing, to make sure that the program works correctly after the corrections we have made.
PyCharm gives us a built-in debugger, thanks to which we can place breakpoints, at places we have chosen. When it reaches a breakpoint, the program stops running and allows step-by-step running of the remaining lines. Debugging allows us to get into the details of the program and see where exactly the errors occur and what is the reason for this.
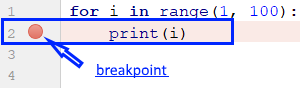
To demonstrate how to use the debugger, we will use the following program:
for i in range(1, 100):
    print(i)
We will place a breakpoint on the function print(…). For this, we will need to move our cursor to the line, which prints on the console, and press [CTRL + F8]. A breakpoint, where the program will stop its execution:
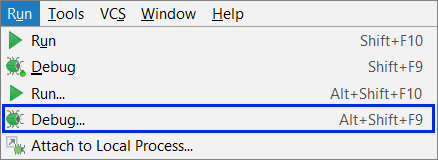
To start the program in debug mode, we choose [Run] -> [Debug...] or press [Alt + Shift + F9]:
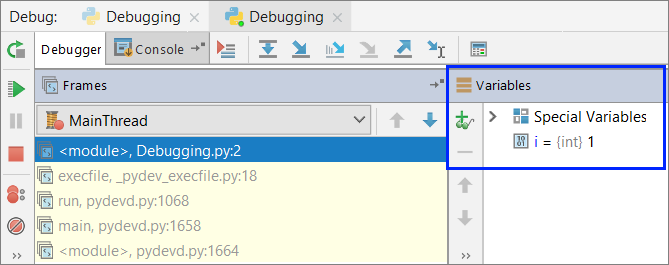
After starting the program, we can see that it stops executing at line 2, where we placed our breakpoint. The code in the current line is colored in yellow and we can run it step by step. To go to the next line e use the key [F8]. We can see that the code on the current line hasn't been executed yet. It will execute when we go-ahead to the next line:

From the Debugger window, we can observe the changes in the local variables. The window opens when we start debugging. To open it manually , we should choose [View] -> [Tool Windows] -> [Debug]:
A guide to tricks
In this section, we will briefly show tricks and techniques of programming with the Python language, some of which are already mentioned in this book, which will be very useful, if you were to take a programming exam for beginners:
Inserting Variable Values in Strings
text = "some text"
print(f"{text}")
# This will print "some text" on the console
In this case, we are using a placeholder – {x}, where x is the name of variable that we want to show. It's possible to use more than one variable, for example:
text = "some text"
number = 5
print(f"{text} {number} {text}")
# This will print "some text 5 some text"
In this example, we can see that we can insert not only text variables. We can also use a given variable several times.
Rounding Numbers
In case we need to round numbers we can use one of the following methods:
round(num, digits)– accepts two arguments – the first one is the number to be rounded, and the second – the number of decimals to use when rounding the number (this number should always be an integer). Rounding is performed according to the basic rule of rounding - if the decimal part is less than 5, rounding is down and vice versa, if it is greater than 5 - up:
first_number = 5.431
print(round(first_number, 2))
# This will print "5.43"

second_number = 5.539
print(round(second_number, 2))
# This will print "5.54" on the console
in case we want the rounding always to be down to the previous integer.
math.floor(…)– in case we want the rounding always to be down. It is important to pay attention that this function is rounding the number to an integer. For example, if we have the number 5.99 and usemath.floor(5.99), we get the number 5:
number_to_floor = 5.99
print(math.floor(number_to_floor))
# This will print "5" on the console
math.ceil(…)– in case we want the rounding always to be up. This function also is rounding the number to an integer. For example, if we have the number 5.11 and usemath.ceil(5.11), we get the number 6:
number_to_ceil = 5.11
print(math.ceil(number_to_ceil))
# This will print "6" on the console
math.trunc(…)– in case we want to remove the fractional part. For example, if we have the number 2.63 and usemath.trunc(2.63), we will get the number 2:
number_to_truncate = 2.63
print(math.trunc(number_to_truncate))
# This will print "2" on the console
Rounding with a Placeholder
number = 5.432424
print(f"{number:.2f}")
In this case, after the number, we add :.2f, which will limit the number to 2 digits after the decimal point and will work like round(…). You should keep in mind that the number after the letter f means how many digits after the decimal point the number is rounded (i.e. it can be 3f or 5f). Don't forget the dot before the number - it is necessary.
How to Write a Conditional Statement?
The conditional if statement contains the following elements:
- Keyword
if - A Boolean expression (condition).
- Body of the conditional construction.
- Optional:
elseclause.
if condition:
    # Body
else:
    # Body
To make it easier we can use a live template for an if construction:
if+ [Tab]
How to Write a for Loop?
For a for loop we need a couple of things:
- Initializing block, in which the counter variable is declared (
let i). - Condition for repetition:
range(5)are the numbers from0to4included. - Body of the loop.
for i in range(5):
    # Body
To be easier to write it, we can use a live template for the for loop:
for+ [Tab]- or
iter+ [Tab]
What Have We Learned from This Chapter?
In the current chapter, we learned how to correctly format and name the elements of our code, some shortcuts for work in PyCharm, some code snippets (Live Templates), and how to debug code.